After a flood, most homeowners focus on what they can see — wet carpet, soaked furniture, standing water in the basement. What most people don’t think about is the clock that starts running the moment water enters the building. Within 24 to 48 hours, mold can begin growing on any wet surface. By the time it’s visible, it’s already been spreading for days.
This guide walks through exactly what needs to happen in that window — and why the decisions made in the first two days determine whether you’re dealing with a cleanup job or a full mold remediation.

Why 48 Hours Is the Critical Window
Mold is not a slow-moving problem. Spores are present in virtually every indoor environment at low levels — they become a problem when moisture gives them the conditions to establish and grow. Wet drywall, wood framing, insulation, carpet padding, and subflooring are all ideal surfaces. Once mold establishes a colony, it spreads and produces more spores, which travel through the air to new surfaces.
The 48-hour window isn’t arbitrary. It’s based on how quickly mold can colonize wet building materials under typical indoor temperature conditions. After 48 hours, the question shifts from prevention to remediation — and the scope of the job grows significantly with every additional day.
Step 1: Stop the Water Source
This sounds obvious, but it’s the step that gets skipped in the chaos of a flood event. Before anything else, the water source needs to be controlled. A burst pipe needs to be shut off. A sump pump failure needs to be addressed. A storm drain backup needs to be managed. If the source of water is still active, drying efforts are pointless.
For natural flooding from storms or groundwater, you may not be able to stop the source, but you can begin moving water out as quickly as possible. Every hour of contact time matters.
Step 2: Remove Standing Water Immediately
Standing water needs to be extracted before any structural drying can work. Wet-dry vacuums can handle small amounts. For significant flooding — anything more than surface water across a room — professional water extraction equipment moves far more volume and gets into corners and under materials that consumer equipment misses.
A common mistake is mopping or toweling water off surfaces without extracting what has soaked into the material underneath. A floor can look dry on the surface while holding significant moisture in the subfloor. That moisture is what feeds mold.
Step 3: Begin Structural Drying with the Right Equipment
Structural drying is not the same as airing out a room. Opening windows helps in some conditions, but it is not drying equipment. To dry building materials — drywall, wood framing, concrete block, subfloor sheathing — you need air movers and dehumidifiers working together to pull moisture out of the structure itself.
Air movers increase airflow across wet surfaces to accelerate evaporation. Dehumidifiers pull that evaporated moisture out of the air before it redeposits on other surfaces. Without both working in combination, the moisture moves around rather than leaving the building.
Professional drying contractors use moisture meters and thermal imaging to track drying progress inside walls and under floors — not just on visible surfaces. IICRC S500 standards define the drying benchmarks that materials need to reach before a space is considered dry.
Step 4: Remove Materials That Cannot Be Dried
Some materials cannot be adequately dried in place. Wet carpet and carpet padding almost always need to come out — they hold moisture too effectively and dry too slowly to beat the mold window. Saturated drywall that has been wet for more than 24 hours typically needs to be removed and replaced rather than dried in place. Wet insulation loses its insulating value when wet and cannot be effectively dried — it needs to be replaced.
Removing these materials quickly opens up wall cavities and floor assemblies so that drying equipment can reach the structural components behind them. Leaving wet materials in place to “see if they dry” is one of the most common decisions that turns a manageable water damage job into a mold remediation project.
Step 5: Document Everything Before You Clean Up
Before moving or removing anything, photograph and video the damage thoroughly. Document the water level if visible, the affected materials, and the extent of the affected area. This documentation supports your insurance claim and establishes the baseline for any mold remediation scope that follows.
Insurance adjusters work from evidence. Thorough documentation at intake — before cleanup begins — is the difference between a supported claim and a disputed one.
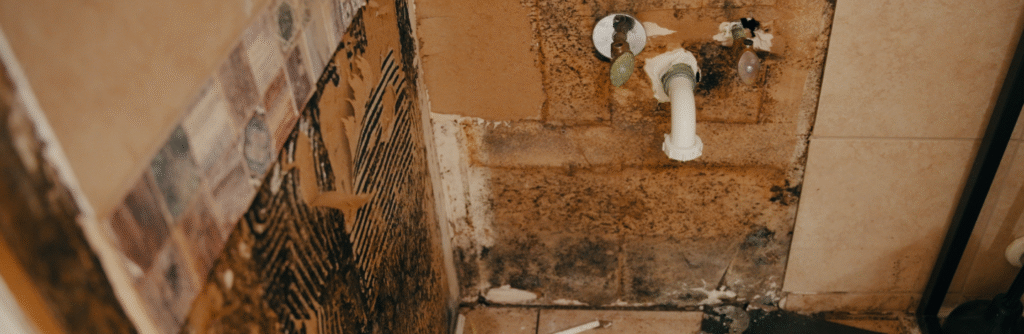
What Happens If the Window Is Missed
If 48 hours pass and wet materials haven’t been addressed, mold is likely already present — even if it isn’t visible yet. At that point, the job shifts from drying and prevention to professional mold assessment and remediation.
Visible mold on a wall surface is late-stage evidence of a problem that’s been active for some time. Professional mold remediation involves containment, air filtration, removal of affected materials, and treatment of structural components — a significantly larger scope than early drying would have required.
The good news is that mold remediation works. The job is bigger and more expensive than prevention, but an IICRC-certified remediation contractor can return a mold-affected home to a safe condition.
Ram Mold Pro Responds to Flood-Related Mold Across Dayton and the Miami Valley
Ram Mold Pro provides mold assessment and IICRC-certified remediation for homes and commercial properties throughout Dayton, Kettering, Centerville, Beavercreek, Oakwood, Springboro, Lebanon, and the surrounding Miami Valley. Whether the 48-hour window has already passed or you’re trying to prevent mold from taking hold after a water event, our team responds fast and works to the IICRC S520 standard.
If your home or building has had recent water intrusion, don’t wait for mold to become visible. Call Ram Mold Pro at 888-609-6653 or visit www.rammoldpro.com to schedule an assessment.